
Introduction
Dental sealants are a preventive dental treatment that helps protect teeth from decay and cavities. They are thin, plastic coatings that are applied to the chewing surfaces of the back teeth, where decay is most likely to occur. This article provides a step-by-step explanation of how dental sealants are applied.
Cleaning and Preparation
The first step in applying dental sealants is to clean the teeth thoroughly. The dentist or dental hygienist will use a dental scaler to remove any plaque or tartar buildup from the teeth. Then, the teeth will be polished to ensure a clean surface for the sealant to adhere to.
Isolation
Next, the teeth that will receive the sealants are isolated using a dental dam or cotton rolls. This is done to keep the teeth dry during the application process, as moisture can interfere with the bonding of the sealant.
Etching
Once the teeth are isolated, an etching gel is applied to the chewing surfaces. This gel contains a mild acid that roughens the surface of the teeth, creating a better bond for the sealant. The gel is left on the teeth for a short period of time, usually around 20 seconds, and then rinsed off.
Sealant Application
After the teeth have been etched and rinsed, the dental sealant is applied. The dentist or dental hygienist will use a brush or a small applicator to carefully paint the sealant onto the chewing surfaces of the teeth. The sealant is a liquid at this stage, allowing it to flow into the deep grooves and pits of the teeth.
Curing
Once the sealant has been applied, a special curing light is used to harden it. The light activates a chemical reaction in the sealant, causing it to quickly harden and bond to the tooth surface. This process usually takes only a few seconds per tooth.
Summary
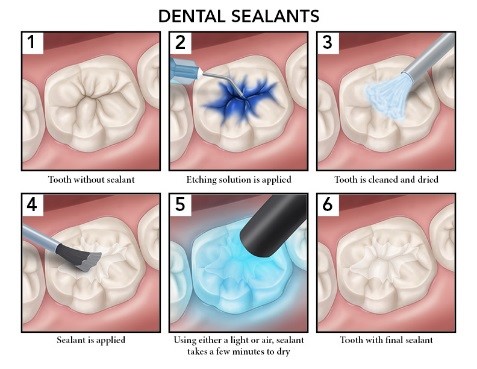
Dental sealants are a simple and effective way to prevent tooth decay, especially in children and teenagers. The process involves the following steps:
- The teeth are thoroughly cleaned and dried.
- An acidic gel is applied to the chewing surfaces of the teeth to create a rough texture, which helps the sealant bond to the tooth.
- The gel is rinsed off, and the teeth are dried again.
- The dental sealant is carefully painted onto the tooth enamel, covering the pits and grooves.
- A special light is used to harden the sealant, making it durable and long-lasting.
- Once the sealant is set, it forms a protective shield over the tooth, preventing bacteria and food particles from getting trapped in the grooves and causing decay.
Overall, dental sealants are a quick and painless procedure that can sig try this web-site nificantly reduce the risk of cavities. They are a valuable investment in your oral health, providing an extra layer of protection for your teeth.
- Q: How are dental sealants applied?
- A: The application of dental sealants involves the following steps:
- 1. Cleaning: The dentist or dental hygienist thoroughly cleans the teeth that will receive the sealants.
- 2. Drying: The teeth are dried using a special tool or air to ensure proper adhesion of the sealant.
- 3. Acid Etching: A mild acid solution is applied to the chewing surfaces of the teeth to create a rough surface, which helps the sealant bond to the tooth.
- 4. Rinsing and Drying: The acid is rinsed off, and the teeth are dried again.
- 5. Sealant Application: The dentist or dental hygienist applies the liquid sealant onto the grooves and pits of the teeth, where it flows into the tiny crevices.
- 6. Curing: A special light may be used to harden the sealant and ensure its durability.
- 7. Checking the Bite: The dentist checks the patient’s bite to ensure the sealant is not interfering with the natural alignment of the teeth.
- 8. Final Evaluation: The dentist evaluates the sealant’s placement and makes any necessary adjustments.
- 9. Post-Application Instructions: The patient is given instructions on how to care for the sealants and maintain good oral hygiene.

Hello, and welcome to my website! My name is Thomas Anderson, and I am thrilled to share my passion for dental hygiene with you. As a professional dental hygienist, I have dedicated my career to helping individuals achieve optimal oral health and maintain beautiful smiles.
